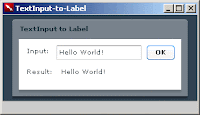
今回は、TextInputコンポーネントに入力した値をLabelコンポーネントに渡してみたいと思います。
前回のマウスイベントの取得を応用して、ボタンをクリックした際にTextInputに入力してある値をLabelに表示させます。
用意するコンポーネントは、
- TextInput
- Label
- Button
今回は、ボタンをクリックしたタイミングでTextInputのテキストをLabelのテキストに代入する処理を行います。この処理を行うには、以下のようなコードを記述します。
public function clickHandler(event:Event):void {
resultString.text = inputString.text;
}
前回同様にクリックのイベントが発生したら、inputString.textをresultString.textに代入します。
resultStringは、TextInputのIDです。
inputStringは、LabelのIDです。

コード全文
<?xml version="1.0" encoding="utf-8"?>
<mx:ApolloApplication
xmlns:mx="http://www.adobe.com/2006/mxml"
width="300"
height="150"
layout="absolute"
backgroundColor="#334455"
creationComplete="createListener(event);"
>
<mx:Script>
<![CDATA[
import flash.events.MouseEvent;
import mx.events.FlexEvent;
public function createListener(event:FlexEvent):void {
myButton.addEventListener(MouseEvent.CLICK, clickHandler);
}
public function clickHandler(event:Event):void {
resultString.text = inputString.text;
}
]]>
</mx:Script>
<mx:Panel
title="TextInput to Label"
width="90%"
height="90%"
horizontalCenter="0"
verticalCenter="0"
paddingLeft="10"
paddingTop="10"
paddingRight="10"
paddingBottom="10"
layout="vertical"
backgroundAlpha="30"
>
<mx:HBox width="100%" height="100%">
<mx:Label
text="Input:"
/>
<mx:TextInput
id="inputString"
width="100%" text=""
/>
<mx:Button
id="myButton"
label="OK"
/>
</mx:HBox>
<mx:HBox width="100%" height="100%">
<mx:Label text="Result:" />
<mx:Label
id="resultString"
width="100%"
/>
</mx:HBox>
</mx:Panel>
</mx:ApolloApplication>

No comments:
Post a Comment